This simple demonstration allows you to access master views and drill down to their corresponding children.
Before you start this ADF tutorial
Before you proceed, you will need to ensure:
- You have an operational instance of Oracle 11g to work on.
- You have already installed the JDeveloper tools.
- You have appropriate system access credentials to connect to the database.
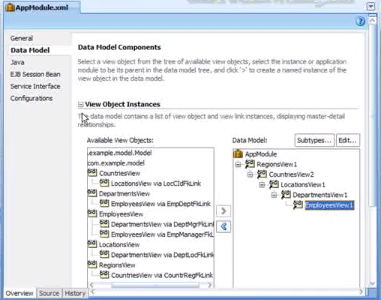
- You already have an application module set up in the JDeveloper IDE which includes a Data Model configured as shown in the picture below:
With these pre-requisites in place, you are now ready to add the Java code.
Creating the Java view implementations
With the JDeveloper IDE console open:
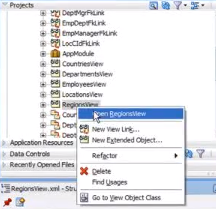
- In the Projects pane of the IDE, right-click the RegionsView view and select Open RegionsView from the context menu.
- Select Java from the xml pane on the right of the IDE.

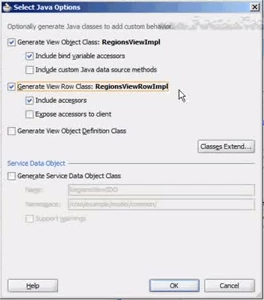
- Click the Java classes button and tick the Generate View Object Class: RegionsViewImpl checkbox on the Java Options box that pops up. Also ensure that Include bind variable accessors, Generate View Row Class: RegionsRowViewImpl and Include accessors are all selected before clicking OK.
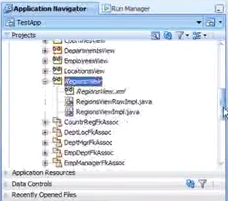
- Returning to the Projects pane, you should be able to expand RegionsView to reveal the new implementations (RegionsViewImpl.java and RegionsRowViewImpl.java):
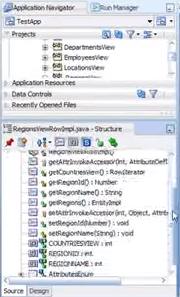
You can also now view the structure of the newly created .java objects in the pane below:
- Repeat step 3 for the other child views:
- CountriesView
- LocationsView
- Departmentsiew
- EmployeesView
Your view implementations are now ready for programmatic access from another project.
Remember you must save the project regularly as you make adjustments!
Creating the ‘viewer’ app
With the views setup as instructed above, the next job is to create the Java class responsible for retrieving data:
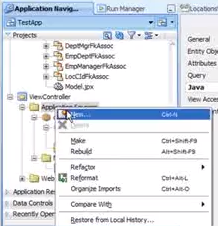
- From the Projects pane, expand the ViewController tree object and right-click Application Sources. Select New from the context menu.
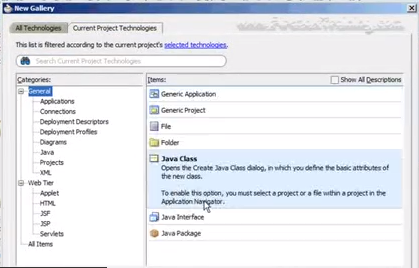
- In the New Gallery window, select Java Class from the right-hand pane and click OK.
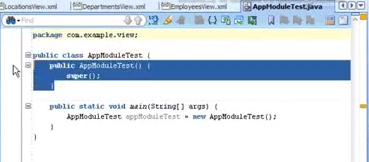
- When the Create Java Class dialog box appears, give it a Name (our is called AppModuleTest) and tick the Main Method option at the bottom before clicking OK.

- In the code viewer window, you can remove all of the code in the public class constructor to help keep code as lightweight as possible.
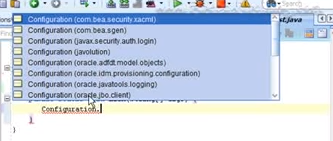
- Create a class called Configuration and import the jbo.client.
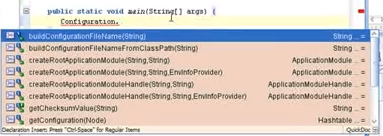
Select the createRootApplicationModule(string, string) application module.
- Returning to the code view, replace the first string argument with the fully qualified name of your application module, and the second with the name of your class with “local” tacked onto the end like so:
createRootApplicationModule(com.example.model, AppModuleLocal)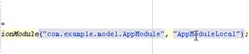 This class will now return an application module. In our example we have also renamed the returned Application Module “AppMod”.
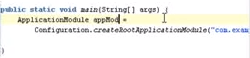
- With the application module in place, you can now reference the findView object, passing in the relevant string of your choice.
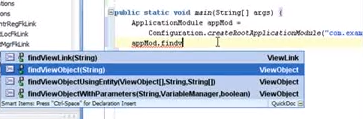
Your code should now read:
ViewObject findViewObject = appMod.findViewObject(arg0);
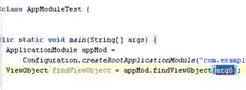
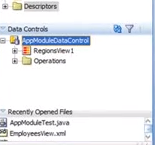
Replace arg0 with the correct name of your data control, which can be found in the Data Controls pane on the left hand side of the IDE window. In this case it is called RegionsView1.
We also renamed our view object vo to keep things simple. The view object should now read:ViewObject vo – appMod.findViewObject(RegionsView1);
- The newly created view object can also be down cast to the appropriate data type. Replace ViewObject with the data type name and click the “lightbulb” icon that appears in the left margin. Then select Cast To ‘com.example.model.RegionsViewImpl’.
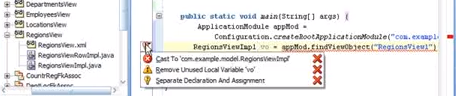
This will then change your code to read:RegionsViewImpl vo = (RegionsViewImpl)appMod.findViewObject(RegionsView1);
- You are now in a position to add a “while” loop directly below the definition in step 8:
while(vo.hasNext()) {
Next()
}
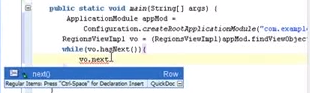
This allows you to call a rowset and cast it to the appropriate data type:
RegionsRowViewImpl row = vo.Next();
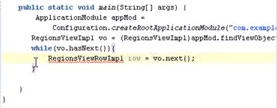
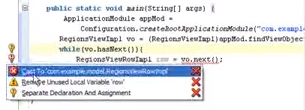
Again, clicking on the “lightbulb” icon allows you to import the data type you need…
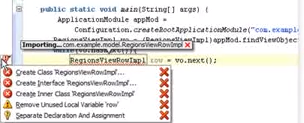
…before down casting it again by selecting Cast To ‘com.example.model.RegionsViewRowImpl’:
The newly added code should now read:
while(vo.hasNext()) {
    RegionsViewRowImpl row = (RegionsViewRowImpl)vo.Next();
 }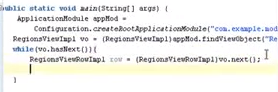
- With these methods in place, you can now “print out” information from the Oracle database. You can print out the Region Name for instance by adding:
out.println(row.getRegionName());

- You can then drill down further into the data sets. Calling getCountriesView() returns a row iterator.
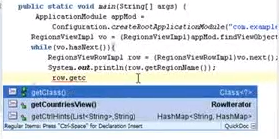

By adding a “while” loop, you can then iterate through the row returned. You can also return the values as a different data type – in our example we will use CountriesViewRowImpl (as shown in the left-hand nav pane):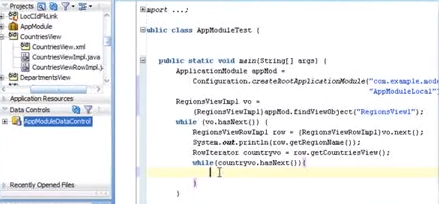
In our example, this new type is called ‘crow’ to help distinguish it from the regions row object. We also down cast it as before using Cast to ‘com.example.model.CountriesViewRowImpl’ so that the code compiles correctly.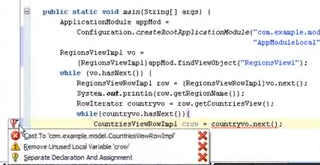
This can then be output to screen using:System.out.println(crow.getCountryName());
The completed “while” loop should now read:while(countryvo.hasNext()) { CountriesViewRowImpl crow = (CountriesViewRowImpl)countryvo.next() System.out.println(crow.getCountryName()); }
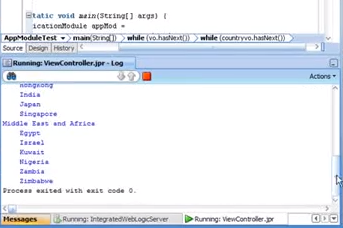
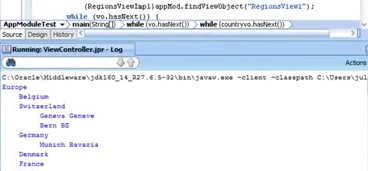
At this point, your code is ready to test and run. You will be able to view the results at the bottom of the right-hand pane – resize the window if required, and remember to give the code time to execute properly.
Drilling deeper
It is possible to keep drilling down into the data available. Dropping into the while (countryvo.hasNext()) loop, we can recover locations using:
Crow.getLocationsView()
Again to avoid confusion, rename the new iterator ‘lvo’ and add a new “while” loop below. The lvo iterator returns a row:
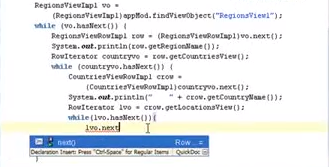
This row object needs to be cast to the appropriate data type using:
LocationsViewRowImpl and renamed lrow. It can then be printed out to screen as before using:
System.out.println(lrow.getCity());
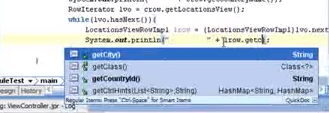
You can even use standard string contructors and the lrow object to collate additional data, such as lrow.getStateProvince(), and to apply indentation to create some form of tabulation for the returned data.
Compiling and running the code will now generate a list of regions, sorted by countries, cities and states.
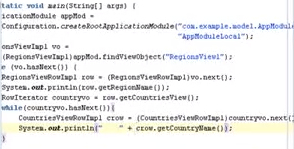
Complete code listing
The complete code for the above example should read as:
Public static void main(String[] args) {ApplicationModule appMod =
Configuration.createRootApplicationModule
(“com.example.model.AppModule”, “AppModuleLocal”);
RegionsViewImpl vo =
(RegionsViewImpl1)appMod.findViewObject(“RegionsView1”);
while (vo.hasNext()) {RegionsViewRowImpl row = (RegionsViewRowImpl)vo.next();
System.out.println(row.getRegionName());
rowIterator countryvo = row.getCountriesView();
while (countryvo.hasNext()) {CountriesViewRowImpl crow =
(CountriesViewRowImpl)countryvo.next());
System.out.println(“ “ + crow.getCountryName());
RowIterator lvo = crow.getLocationsView();
While(lvo.hasNext()) {LocationsViewRowImp; lrow =
(LocationsViewRowImpl)lvo.next());
System.out.println(“ “ + lrow.getCity());
}
}
}
}
Obviously this is just a very simple example, but building on these techniques you will be able to access and manipulate data from your Oracle database in any way you need.
Watch our ADF tutorial video on programming view objects
Click here to check out our Oracle ADF 11g training courses, where we cover this and much more.
To subscribe to us on youtube and watch our library of ADF tutorial videos, visit the Firebox Training YouTube channel.
